 Elm으로 웹사이트 만들어야지!!! 했는데 그전에 Elm architecture를 이해해보기 위해서 Android에서 Elm architecture를 이용해서 간단한 Todo앱을 만들어보기로 결정했다.
glung/elm-architecture-android 이미 시도된 프로젝트가 있었다. 이 프로젝트는 카운터를 구현한 프로젝트이다. 나는 더 나아가 TodoList를 만들어 보고 싶었다.
Elm Architecture
The Elm Architecture is a simple pattern for architecting webapps. It is great for modularity, code reuse, and testing. Ultimately, it makes it easy to create complex web apps that stay healthy as you refactor and add features.
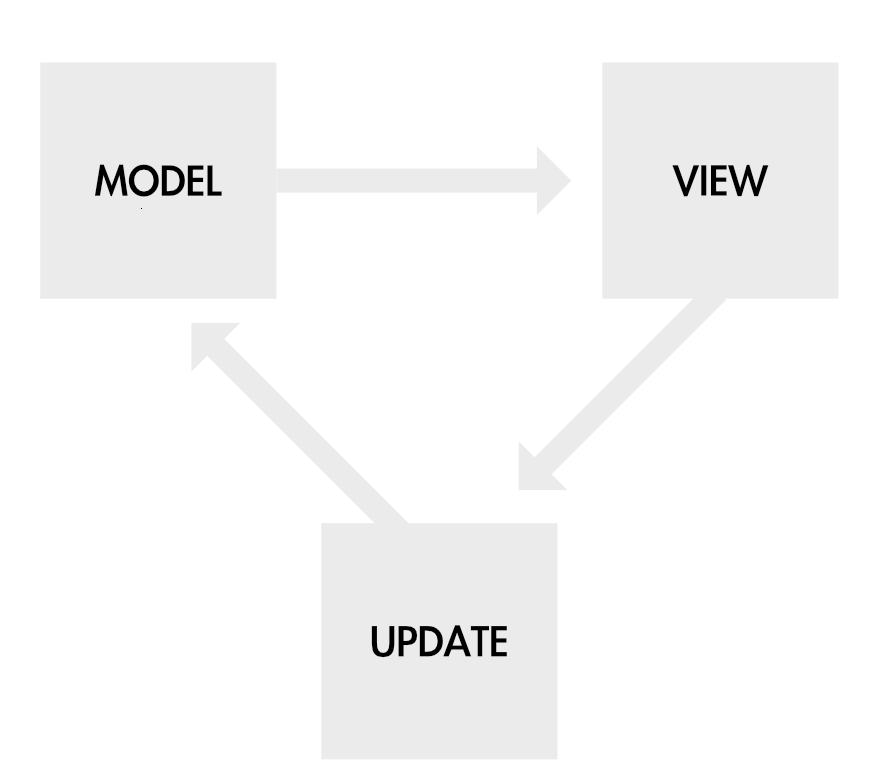
MVU라고 불리기도 한다.
MODEL - VIEW - UPDATE 이 세 가지를 갖는다.
MODEL을 이용해서 VIEW를 그리고!
VIEW에서 ACTION이 일어나면!
MODEL을 UPDATE하고!
업데이트된 MODEL을 다시 VIEW에 그려준다!
Todo app
간단한 Todo앱이다. Kotlin으로 만들었다. Anko라이브러리를 이용했다.
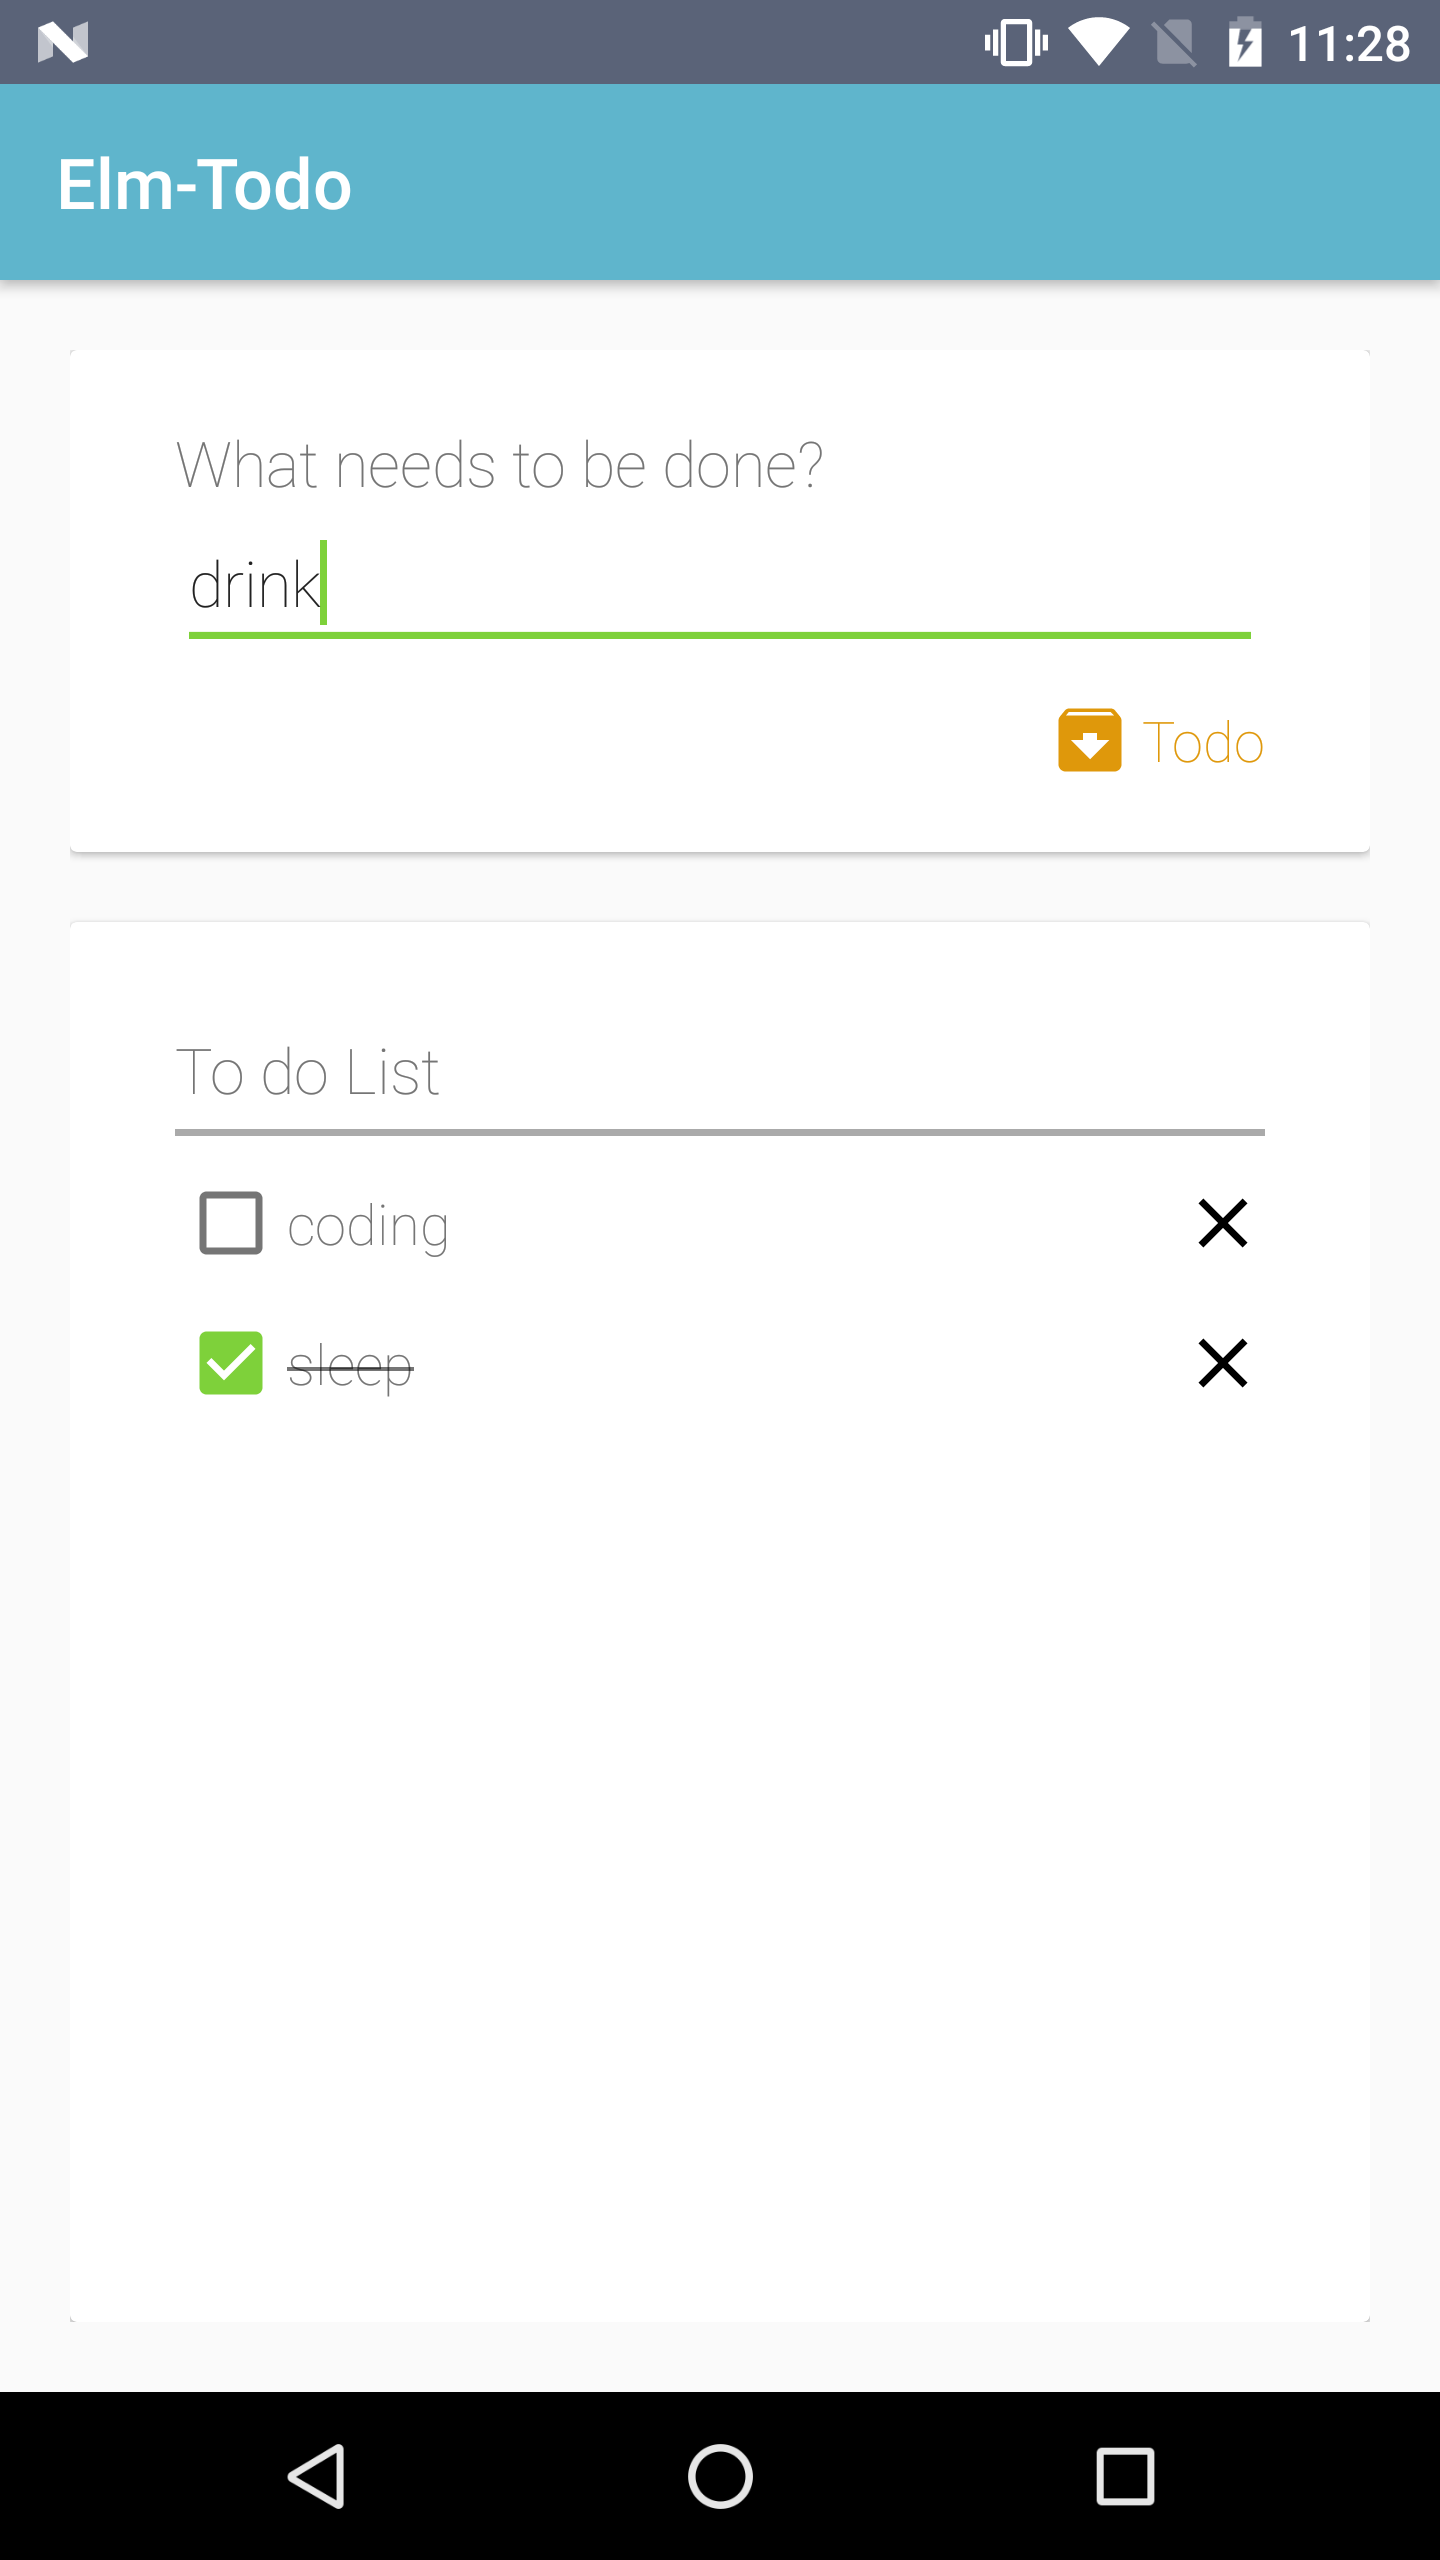
Flow
EditText에 텍스트를 입력하면 TodoList에 작성한 string이 들어간다.
그리고 list에선 done, ing등으로 상태를 바꿀 수 있고, 삭제 할 수 있다.
구현
소개된 프로젝트를 보고 구현을 했다.
Activity
간단하다. onCreate 할때 dispatch를 해서 Init action을 발생시킨다.
dispatch는 액션이 발생하면 모델을 업데이트 시켜주고 dispatcher를 생성시키고 view를 호출해서 view를 그려준다.
dispatcher는 action을 받으면 dispatch함수를 리턴해준다.
class MainActivity : AppCompatActivity() {
    override fun onCreate(savedInstanceState: Bundle?) {
        super.onCreate(savedInstanceState)
        dispatch(this)
    }
}

fun dispatch(activity: Activity, action: Action = Action.INIT, model: Model = Model()) {
    val updatedModel = update(action, model)
    val dispatcher = dispatcher(activity, updatedModel)

    activity.setContentView(view(activity, updatedModel, dispatcher))
}

fun dispatcher(activity: Activity, model: Model) = { newAction: Action ->
    dispatch(activity, newAction, model)
}
Todo
Action
sealed class를 이용해서 Action을 정의해줬다.
sealde class는 설명으로는 enum의 확장형이다.
the set of values for an enum type is also restricted, but each enum constant exists only as a single instance, whereas a subclass of a sealed class can have multiple instances which can contain state.
sealed class Action {
    object INIT : Action()

    class ADD(val todo: String) : Action()

    class DONE(val position: Int) : Action()

    class ING(val position: Int) : Action()

    class DEL(val todoInfo: TodoInfo) : Action()
}
Model
모델은 하나의 arraylist를 갖고 있다.
data class Model(val todoList: ArrayList<TodoInfo> = arrayListOf())
view
Anko를 이용해서 그려줬다. Anko를 이용해서 view를 그려본건 처음인데, 쉬웠다. 잘만든 라이브러리이다. Model을 받아서 그려준다. 나름 간단한 프로젝트인데 생각보다 길고 복잡하다. 더 잘 작성하는 방법이 있겠지…(?)
fun view(context: Context, model: Model, dispatcher: (Action) -> Unit): LinearLayout {
    with(context) {
        return verticalLayout {
            cardView {
                setContentPadding(dip(30), dip(20), dip(30), dip(20))
                verticalLayout {
                    textView(context.getString(R.string.title_todo)) {
                        textSize = 18f
                    }

                    val e = editText {
                        lparams {
                            width = matchParent
                            bottomMargin = dip(10)
                        }
                        hint = context.getString(R.string.hint_edit)
                        lines = 1
                        inputType = InputType.TYPE_CLASS_TEXT
                    }

                    textView(context.getString(R.string.txt_msg)) {
                        lparams { gravity = Gravity.END }
                        gravity = Gravity.CENTER_VERTICAL
                        textColor = R.color.colorTodo.getColor(context)
                        setCompoundDrawablesWithIntrinsicBounds(R.drawable.ic_todo_24dp, 0, 0, 0)
                        compoundDrawablePadding = dip(3)
                        textSize = 16f
                        val attrs = intArrayOf(R.attr.selectableItemBackgroundBorderless)
                        val typedArray = context.obtainStyledAttributes(attrs)
                        val backgroundResource = typedArray.getResourceId(0, 0)
                        setBackgroundResource(backgroundResource)
                        typedArray.recycle()

                        onClick {
                            val todo = e.text
                            if (todo.isNotEmpty())
                                dispatcher(Action.ADD(e.text.toString()))
                            else
                                Snackbar.make(this, context.getString(R.string.input_msg), Snackbar.LENGTH_SHORT).show()
                        }
                    }

                }
            }.lparams(width = matchParent, height = wrapContent) {
                bottomMargin = dip(20)
            }

            cardView {
                setContentPadding(dip(30), dip(30), dip(30), dip(30))
                verticalLayout {
                    textView(context.getString(R.string.title_list)) {
                        textSize = 18f
                    }

                    imageView {
                        backgroundColor = android.R.color.darker_gray.getColor(context)
                    }.lparams {
                        width = matchParent
                        height = dip(2)
                        topMargin = dip(5)
                        bottomMargin = dip(5)
                    }

                    recyclerView {
                        layoutManager = LinearLayoutManager(context)
                        adapter = TodoListAdapter(model.todoList,
                                { position, isDone ->
                                    View.OnClickListener {
                                        if (isDone)
                                            dispatcher(Action.ING(position))
                                        else
                                            dispatcher(Action.DONE(position))
                                    }
                                },
                                { todoInfo ->
                                    View.OnClickListener {
                                        dispatcher(Action.DEL(todoInfo))
                                    }
                                })
                    }.lparams(width = matchParent, height = matchParent)
                }
            }.lparams(width = matchParent, height = matchParent) {
                padding = dip(20)
            }

        }.applyRecursively {
            when (it) {is TextView -> {
                it.typeface = Typeface.create("sans-serif-thin", Typeface.NORMAL)
            }
            }
        }


    }
}
update
model을 액션에 따라서 update를 해준다.
fun update(action: Action, model: Model): Model {
    return when (action) {
        is Action.INIT -> Model()
        is Action.ADD -> {
            model.todoList.add(TodoInfo(model.todoList.size + 1,
                    action.todo,
                    false,
                    System.currentTimeMillis() / 1000))
            model
        }
        is Action.DONE -> {
            model.todoList[action.position].isDone = true
            model
        }
        is Action.ING -> {
            model.todoList[action.position].isDone = false
            model
        }
        is Action.DEL -> {
            model.todoList.remove(action.todoInfo)
            model
        }
    }
}
결론
흥미로웠다. 지금까지 Android 개발을 하면서 MVC, MVP, Flux의 구조로 만들어봤다.
내 기준에서 구조 자체에 대한 이해가 쉬운건 이번에 사용한 Elm architecture이다. Flux도 쉬운 구조였지만 MVU가 더 쉬운것같다.
물론 MVU는 간단한 예제 수준의 앱을 만들었기때문에 그렇게 느껴지는것일 가능성이 크다. 아니 그럴것같다.
나는 Todo앱을 좀더 발전시켜볼 생각이다. 더 복잡한 상황에 놓여지면 어떤식으로 해결이 가능한지 보고 싶다.
좋은 해결 방법을 찾는다면 앞으로 실제 프로덕트에도 적용시켜보고 싶다.(물론 elm을 이용해서 웹사이트도…)
앞으로 보완해서 잘 사용해보고싶다.
다양한 unidirectional data flow
UNIDIRECTIONAL USER INTERFACE ARCHITECTURES 여기에 정리가 잘 되어있다.
여기에 있는 architecture를 하나씩 구현해보면…(?) 좋은 공부가 될것같다.